

It all started with this:
![]()
See that large blank wall space above my bed?
I wanted something to fill it. I have this cool candle-holder-wire-thing that I thought might be pretty, but since it’s my bedroom, I wanted it to be something more personal and romantic…not a boring old “something I could just buy in the store.”
So I waited. And kept my eye out for some inspiration.
I found that I loved those big canvas prints. You know, the ones that are beautiful and expensive? I really liked the look of them but wasn’t interested in paying $80 for one. So I waited and kept looking around.
While waiting, I browsed around on Pinterest and came across this link on Blue Cricket Design written by The Sassy Pepper. I also checked out a tutorial by Girl. Inspired. on the same project. Both links talk about how to create your own canvas print. After a bit of fear and trepidation…I decided to give it a go.
I started with these canvases. Found them at Hobby Lobby – a 2-pack for $7.99. Nice.

Then I had a 16×20 picture printed. Since I was going to hang this in my bedroom, I wanted a wedding pic:

I found out that Sam’s Club has some pretty sweet prices on photo printing. I got this 16×20 print for $6.39 and it was ready in 1 hour. Nice!
I started out by painting the edges of my canvas brown. I got this brown paint from some free promo Glidden was doing a while ago. Thanks for “getting me going,” Glidden!

And here’s a pickle jar. I made some homemade mod podge and used it in this project. Cheap. And it worked. Wonderful!!

Take your mod podge and paint it all over the top of your canvas:

Then brush the mod podge on the back of your picture. (I trimmed the white edges off my pic before doing this.)
")
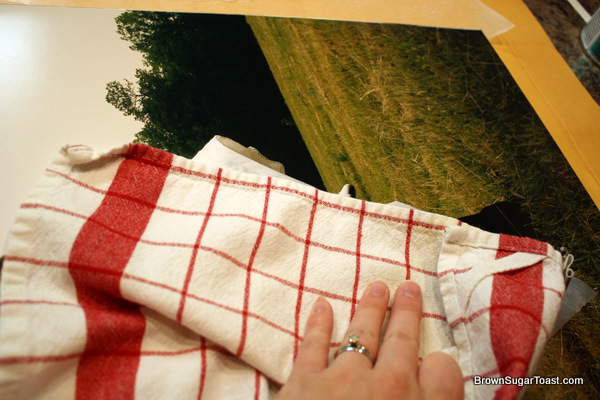
Take a clean towel or cloth and smooth the picture flat on the canvas. Start from the middle – as my hubby pointed out to me.

Wait for the mod podge to dry and the picture & canvas to “bond” together. Like two good friends. Or two best friends. After they have bonded for about 20 minutes, paint the front of your picture with mod podge. Make sure to paint it evenly and completely over the entire picture. (this is the part that scared me. I was afraid to ruin my lovely picture!)

Let the whole thing dry for about 20-30 minutes.

Now that your canvas is dry, its time to make the edges look cool. To do that, take a dry sponge, dip it in the paint, brush the excess off on a paper plate, and lightly brush the edges of your picture.

Remember: Start with a little paint at first. You can always make it heavier if you want.
Your picture edges will end up looking like this:

And here it is hung up in my room:

Do you wonder why it’s not centered? It’s called artistic expression.
kidding…
Actually, I made something with the other canvas print. I’ll show it to you soon. {UPDATE: Here’s what I made with my other canvas! Love them both!}
So that’s part of my wall art project for my bedroom. Let’s see:
$4 – 1 canvas print
$6.39 – 1 massive pic from Sam’s Club
$1 – to make my homemade mod podge
Total cost for my 16×20 canvas print was $11.39.
Not too shabby. Not too shabby indeed. 🙂
Let me know if you make one!!
Linking up to:
A Beach Cottage
Comments
33 responses to “Happily Ever After DIY Canvas”
I dearly love that picture and am so glad you chose it for your spotlight – can’t wait to see the other one when it’s ready!
Mary
ooooo! I love this! So cool looking 🙂 Good job,Christa and that home made mod podge is brilliant.
LOVE!!! so it really does work? and the homemade mod podge works too? that is wonderful.
can’t wait to do one or a set of 3 🙂 just have to work on the room re-do first.
And I think we need a house tour. 😉 Love your comforter set on your bed and your bed is pretty too! 🙂
if you do a house tour, I’ll do a house tour! ha! 🙂 just give me about 2 weeks to clean first. 😉
Yes!! it really does work! And the homemade mod podge works too!!! LOVE it! so much cheaper than the name brand. 🙂
Wow! What a great example of how to DIY a great piece of art. Thank you so much for sharing!
So cool! I’ve been wanting to do this for a while…thanks for the motivation to just get it done! =)
Definitely!!! It was soo worth it!
Sure thing!
yes, it sure is!! Thanks Chelo!!
can’t wait to show it to you 🙂
Christa, I love love love this! I have been wanting to try this too, but I also was a little nervous about “painting” precious pictures. Yours is beautiful. Wonderful job!
why oh why do I never get your email replies?? 🙂 trying another comment with my personal email address. 🙂
Which mod podge recipe did you use? Just elmers glue and water? or a flour recipe?
yes – elmers glue & water!
boo – let me know if you get this one!
it took me a minute to actually “paint” my picture with the mod podge, but it helped that the pic only cost $6 so I figured if I ruined it, I wasn’t wasting tons of money. 😉
This is so very awesome!! Love it! Such a frugal project that looks like it cost tons!!!!
So glad you posted this! I’ve eyed up those canvas mounts but have never thought I needed one badly enough to pay the $$ for it!
& now you can have one at a fraction of the cost!!!
thanks, Renee!! I love having it in my bedroom – so nice and “romantical” 🙂
[…] a recent one to begin with…my DIY canvas print. I have gotten several questions and comments about this one. I have one thing to say to […]
I made two of these canvasses for my nieces and nephews who lost their mother to breast cancer in August. These were the only gifts cried over. 🙂 I’ll have to send you some pics. They turned out beautifully and the kids LOVED them!!!
[…] a few ages ago, I showed you how I made my own canvas print for my room. Remember this picture from days of […]
[…] also possible to do a similar canvas using a color photo, as my sister-in-law Christa shows here. Now I just need to do some photo shoot to get some good black/white photos of my girls! […]
That is so cool! Do you think that over time the picture will start to discolor? That would probably make it look even more “artistic”.
Hey Meghan! hmmm…I don’t think the picture will discolor. Ask me next year… 😉 Thanks for stopping by!
Hi, I just found your page. I actually tried the canvas picture myself. Do you have to put the mod podge over the top of the picture? When I did it, some parts had a milky film on it. I used the “recipe” that you posted on here. Other than the uneven, milky look, it came out fine and was very easy to do. Help and thanks!! lol
Hey Celeste!! Putting the mod podge over the picture gets rid of the glossy picture look and “seals” it a bit. It’s not completely necessary if that’s not the look you’re going for. The only reason I can think of that it came out uneven and milky is maybe it wasn’t mixed well enough? So sorry it didn’t come out like you wanted! 🙁 My picture looked somewhat “milky” while the mod podge was wet, but once dried, it evened out and disappeared. Hope that helps!!
I LOVE THIS!!! I think this is what us kiddos will do for an anniversary present to our parents! Thanks for the awesome idea!!!
What a GREAT idea, Gina!!! Let me know if you have any questions!
I love that your wedding dress had sleeves, mine did too! 🙂
Ok so a couple years later and we are doing this as an anniversary gift! What would you do differently if you are using multiple pictures on one canvas?
hmmm, that sounds a little tricky, but definitely worth a shot! I’d lay it out to be sure what position I want the pics in, then make sure to start with the picture closest to the canvas (if they’ll be overlapping). Just go slowly and carefully as you adhere the pics to the canvas and make sure to use a good coat of mod podge on top so all the edges stay down. 🙂