Approximately 6 months ago, my husband came home with a surprise for me. Namely, these pallets:
I was so thrilled that I actually told you all about it here. And I also told you about some free paint from Lowe’s & random 50 cent boards I bought at Ikea. I had no idea what I would do with all these items, but I was just excited at all the lovely possibilities that awaited me.
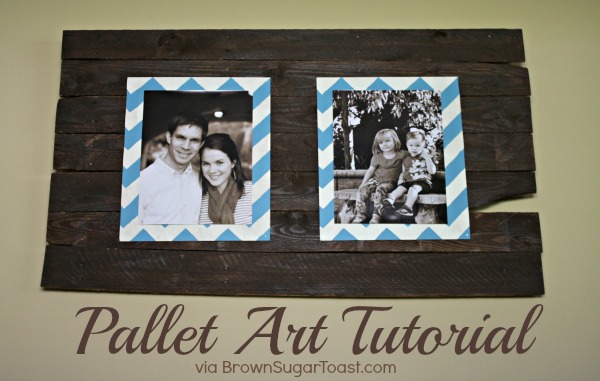
Little did I know that I would use all 3 items in the same project. Here it is – my very own pallet art tutorial:

We love it.

I’ll tell you about the pallet part first and then explain the chevron boards.
First, you need to take the pallet apart. I graciously allowed my husband to do this part. {thanks, honey!}
here’s a tutorial on how to take it apart with a sawzall.
After taking it apart, I used some leftover stain on the front of the boards.
Then my husband put them back together using a leftover piece of wood from another project.

Here, you can see how he screwed each board into the back supporting piece of wood.

To hang it, we used picture wire, wrapped each end around a screw (1 on each of the supporting pieces of wood) and screwed it into the pallet boards.

Voila. That’s it for the pallet part of the project.
As far as the boards, I took the two 50-cent Ikea boards and painted them with 1 coat of leftover white paint. I really wanted to have a chevron pattern on my pallet art {inspiration via Laine}. So I searched around for a chevron tutorial & found this one super helpful. Not gonna lie – it took a while. But I pretended it was therapeutic and just did it as quickly as possible. Here’s what my board looked like after following this chevron tutorial:
I took my free teal paint and filled in every other line to create 2 chevron boards. After everything was dry, I attached both chevron boards to the pallets using 4 small finishing nails.
I think I’ve mentioned how much I love printing pictures at Sam’s Club? I’ve heard Costco does a great job as well. They’re quick, cheap and great quality. I’ve always had a great experience there. {except for 1 extremely stressful time when I needed something printed for a deadline and there was an incompetent worker there who didn’t get it done. but anyway…ahem.}
Anyway, I printed these 2 pictures off at Sam’s Club and adhered them to the chevron boards using sticky tack.
And voila – behold the finished project:

The whole piece is 27″ tall and 4′ wide. It’s hanging in my living room above my craigslist sofa:
If you want to see more projects made using pallets, check out these ideas!
So, that’s it! The mystery of what I did with my pallets is finally solved. Case closed.
Have you ever built anything using pallets?


Comments
4 responses to “Pallet Art Tutorial”
I love it! It turned out fabulous! I really like the colors on your chevron paper too.
thanks, Deanna!
I love this idea! I would love something like this in my hall. I’ve Pinned for a future project. Thanks!
sure thing, Cherie! thanks for the pinterest love. 🙂