I was compensated for this post, but all opinions are my own. As always. Carry on.

It was about time I updated my doormat. My old mat just celebrated its 4th birthday and is beginning to feel the effects of aging. When I saw this mat at Ikea for a whopping $4.99, I decided to make it my own. A plain mat + graphic stencil from Stencil1? Winning.

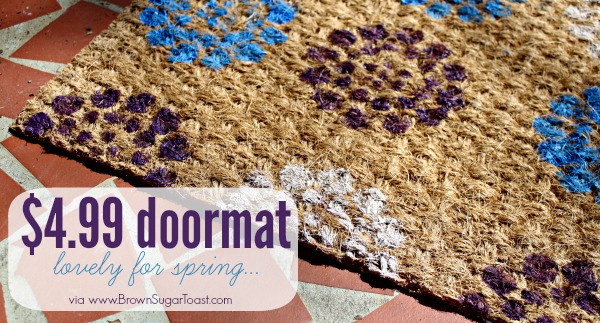
Originally, I thought about using these 4 colors on my mat. But then decided the pink was brighter than what I wanted, so I stuck with Eggplant, Parchment, & Look At Me Blue. AKA purple, white, & blue.

I grabbed a few styrofoam bowls for the paint, my stencil, mat, & paintbrush. Then I headed outside during this amazing spring weather we’ve been enjoying here in the south. {silently breathing a prayer that I will always live in a place with mild winters…}

First, figure out how you want your pattern to look. Personally, I think this stencil would look amazing on a wall. But I voted against that since we’re renting. How good of me, right?
I decided it would be safest to start in the bottom left corner:

Since I’m smart-lazy, I didn’t tape down my stencil. Because that would mean another trip inside. Not cool. So I just held it down each time. No biggie.
Also, I was planning to tape lines for my rows of stencils. But then I realized there were already lines ‘built in’ to my mat. See here?

I used those lines as my guides, started painting, and here’s what things looked like after a few minutes:

Also, because I love you & want you to have a positive DIY experience … if you decide to stencil on a doormat, I do not recommend using a soft paintbrush like I initially did. That brush would be perfect if you choose to use the stencil on a wall, table runner, canvas, etc. But because of the coarseness of the doormat, I eventually started using a little sponge. And that worked much better.
Here’s the fun spring-y addition to our porch:

I love how the stencil reminds me of flowers – definitely perfect for spring! You can find these reusable stencils at Jo-Ann Fabrics or at your local craft store, so if you’re in the mood for a fun little project, definitely check out the lovely selections for some inspiration.

I still have some paint left, so I’m debating what to use it on. I had no idea the FolkArt multi-surface paint was even dishwasher safe!? Ever since I read that on the bottle, I’ve been scheming about painting the outside of our coffee mugs. mwahahaha…nothing is safe from being painted with me around.
Anyone else making a springy stenciled doormat?
For more lovely inspiration, check out the Plaid Palette on their social media sites below:
The Plaid Palette blog
Pinterest
Facebook
Twitter
YouTube
Instagram

I was compensated for this post, but all opinions are my own. Of course.
Comments
One response to “A Springy Stenciled Doormat”
Lovely! And cute stencil!