Wow – it’s been a long time since I’ve posted anything in the area of home decor! I definitely loved our time in the 31 Days of Building Your Marriage series, but it is kinda nice to get back in the swing of things. 🙂
I guess I’ve never shown you any pics of my little girl’s room – besides the ipod pics I took the day we moved in. (and those definitely don’t count!)
This was the problem wall. I mean, it wasn’t a big problem…I just wasn’t sure what to put up there. I was planning to just put some of our family pics up there – I already had the frames and some pictures. But while I was browsing Pinterest, inspiration struck. 🙂
Have you ever seen the vinyl wall art – the tree-shaped ones? I think they are the coolest things. A while ago, one of my sisters was looking at some on etsy and I suggested she paint it on her wall instead. Cheaper, ya know?
I decided to take my own advice. 🙂 Here’s how I did it…first, I found several pictures of trees and branches that I liked. I tried to combine some elements from them and traced it out on a piece of paper. My friend (hi, Shannon!!) let me borrow her projector and I projected my rough sketch up on the wall.
That sounds all neat and tidy, but here’s how it looked:
Oh goodness. 😛 Good thing my little girl has lots of books, right?
I took a pencil and traced the branch on the wall. This is what I ended up with:
Then I started to fill it in with paint. I had some leftover paint that I had bought to paint the trim in my guest room, so I decided to put it to good use.
This was the most monotonous part of the whole project. My wall isn’t super smooth, so it was a bit of a pain to try to paint a branch on it…not the same as using a big ol’ roller and painting the whole wall! Here it is after the first coat:
I ended up doing 2-3 coats of paint. It just took a while to get it to look “filled out” like I wanted. Finally, the deed was done and it was time to accessorize my tree! (I know – I’m such a girl) 😉
Remember those satin flowers I showed you how to make? This is where my price point ($1.62) comes in. I went to the fabric store and bought 2 colors of pink satin. Each piece was 81 cents. Then I made lots of flowers out of them and stuck them on my tree.
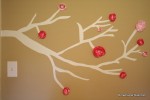
Here’s the finished product:
You like? I do…a lot. 🙂 It’s so girly and goes perfectly with the rest of her room.
Here’s another pic just because:
For now, the flowers are on the wall with masking tape. They’ve been on there for about 3 1/2 weeks, so I’m not planning to use any other “adhesive” unless they fall down. 🙂
That’s it! $1.62 satin + leftover paint + time = original wall art.
Not too shabby. It also helps if you have a nice friend who will let you borrow their projector. For free. 😉
Have a fabulous Friday!!
Linking up to:
Under the Table and Dreaming


Comments
4 responses to “$1.62 Wall Art”
That is beautiful!! Way to go!
OOH!!! I love it!! Jacqueline is sitting here and I just got a great big, “AAAWWWEEEE” from her!!! =)
Yea!! I love what you did with the flowers. They really do complete the whole wall. Lovely! And so much cheaper than etsy. 😉
So cute :). I wish I could paint on my walls too.