As the title of this post suggests, I’ve decided to hire kitchen help. Things are getting stressful and I can’t take the whole “3-meals-a-day” thing anymore.
I don’t even know what to say after starting off with such a corny joke. Except maybe – no, I’m not hiring any kitchen help, so no need to start getting jealous and discontent because nada – nothin’ happenin’ 🙂
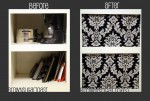
On the contrary…there’s a part of my kitchen that needs some help. You see, there are 2 open cabinets. They look like this:

Before I go on…yes, our coffee pot really does sit up there. We don’t use it much during the summer, so he happily resides off the counter in order to free up some space for other essential items. And no, the bottom cabinet does not always look so neat. Especially when I’m in a baking/cooking frenzy and grabbing cookie sheets and cutting boards out at the speed of light. 😉 just thought I should clarify. now, let’s go on…
So I know that “open shelving” seems to be all the rage with some people right now, but these cupboards/cabinets are definitely not conducive to that sort of thing. Not to mention, I’m not a huge fan of open shelving…especially since my cookie sheets look the way they do.
So I had this idea in my mind to make curtains for the cupboards to kinda close them off without completely closing them off. I figured I could find some tension rods and just hang the curtain rods up that way. But first…I had to find fabric.
During one of my yard sale jaunts a couple weeks ago, I stopped at this house with who-knows-how-much-stuff. Seriously…there was everything here – and lots of it. I wondered how they could sell all this stuff and still have anything in their house. One thing they had was a big old cart full of material. I spotted this beauty among the others and got the 3 remnants that were left. I think I paid $1 each? I don’t remember, but I would be happy even if I paid $2 each. This is high quality material. If I were an excellent seamstress, I would be able to tell you exactly what kind of material it is. But I’m not an excellent seamstress. So I will tell you that 1) it’s not fleece, felt, silk, or satin. 2) it’s thick. reallllly thick.
And there ends my sewing expertise. I’m sure some of you will be able to just look at it and tell me what it is:

Anyway, I found this material and decided it would be perfect for my kitchen cupboards. I checked at Lowe’s for tension rods, but they didn’t have any that were the right size.
I found the rods I needed at Anna’s Linens for $3.99 a pop. Unfortunately, I found similar rods at Hancock Fabrics (after I had already opened my rods from Anna’s) for about $1.20 a pop. Note to self: never shop at Anna’s Linens again. 😉 (kidding. sort of.) Tension rods are a cinch to use. I think mine were 18″ – 28″ long, so all I had to do was twist the rod until it expanded to the right length, which in my case was 23 3/4″.
I started by washing my fabric. It had a really weird smell to it. Like the people who sold it to me had it stashed in an old abandoned attic for several years. hmph…I wonder… So I washed it with lots of soap and put extra fabric softener in too. Then I ironed it all:

My iron and I have spent a lot of time together lately. We were becoming pretty good buds but then he burned me today, so I called the whole thing off.
I am sure this is not a technical tip, so don’t follow it. I’m just going to tell you what I did, but don’t expect professional results if you follow my advice. Since the material is so thick, I cut a little “notch” out of the corners where the 2 hems would meet. See this?

That’s my little notch. That way, I wouldn’t have to sew through 5 layers of this thick material. It wouldn’t have even fit under my sewing machine foot. (I guess there’s some way to adjust that thing, but I certainly don’t know how. I’m still trying to figure out how often I need to oil my machine. Once I figure that out, I’ll have to figure out where to put the oil. I can just picture myself putting oil on the wrong parts…)
My hem for the top had to be 1 3/4″ so I could fit the rod through it:

I just ironed my hems, sewed them up, slipped the rod through, and hung the curtains. It was quite a joyous occasion once they were finally up. I kept telling my husband over and over that I had finished them and they looked great and wasn’t he proud of me… 😛 yes, I do beg for compliments.
Here’s the finished product:

And so you don’t have to scroll all the way up again to see the “before,” I have kindly placed it below for you: 😉

It’s not perfect. But I love it. And so it’s perfect for us. It really makes the whole kitchen look better!
So, that was one of my projects last week. How about you? I know some of you are homeschooling your kiddos, so I imagine that was a pretty big project you started last week! 😛
Hope you all are doing well!!
~Christa
Linking up to:
Keeping it Simple
Making the World Cuter
It’s So Very Cheri
CRAFT
Craftomaniac
Home Stories A to Z
Just a Girl
Comments
20 responses to “Kitchen Help”
Love it!! How clever and classy looking!!! It looks like some kind of upholstry fabric, which is why it’s so thick, but what do I know!?!?! =)
I was thinking it might be some sort of tapestry/upholstery fabric…whatever it is, it looks fantastic! What are your other kitchen colors? Very, very cool.
um…much more than me in the sewing department!!! 🙂
thanks, Katie!!! well, at the moment I don’t have other kitchen colors. 🙂 I’m thinking of doing red, though, because I die over the red & black combo. 😛
Those look great! Love the damask print – it’s one of my favorites! 🙂
thanks, Jamie! they really add sooo much to the overall look of the kitchen!
These turned out really nice. Bummer about the better price on the rods AFTER you opened yours. I hate when that happens.
Ooo, I love damask! And that’s high quality woven upholstery fabric..a great find for $1!! Glad you found a solution to your open cabinet, I’ve done that before and it worked well for our family.
It looks lovely! I also love the black and red combo!! 🙂
The fabric is beautiful, great find! I love how you used it to cover your open shelving. I’ve been thinking of covering the opening in my tv stand, yours looks so good, you’ve inspired me to hurry up and get it done. 🙂
aw yea! I find so much inspiration from the internet…I’m glad this project was an inspiration to you. hope your tv stand “covering” goes well. thanks for stopping by!! 🙂
I know!! grrrr…oh well – I suppose it’s worth it, but it would be so much nicer to have only spent 1/2 the $! thanks for stopping by!! 🙂
aha! a fabric expert has arrived!! 🙂 thanks for letting me know what kind of fabric it is!
o yes…I have loved it since I was in high school!! 😛 every time I see a whole room painted red it always gets me!
I am going to paint a coffee table and two end tables that were given to us. I think this will be a fun project:).
oooohhhhh…good for you, Abby! that will be a fun project! what color are you painting them?
I am going to paint them an off white color. We will see how it works out because the legs are made of iron. I am only painting the wood part but I am just not sure how it will work with the iron.
Good for you! I hope they turn out even better than you imagine. Let me know how it works!!
[…] Kitchen Help […]
[…] my fabric covered cabinets? still goin’ […]